Posts

Showing posts from February, 2020

Craft Retreat Recap

Image
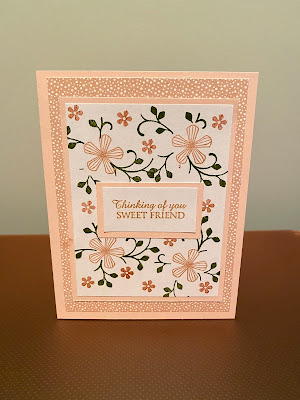
Hi, friends!  This past weekend I went on a craft retreat with some friends and other ladies in my Stampin' Up! team.  It was great!  While I can't show you the big project I worked on yet, I wanted to share a few cards.   As always, anything in bold is linked below.   The first set of cards took me maybe 10 minutes to make all 5.  How?? Paper Pumpkin.  These are all from the December 2019 Paper Pumpkin called Something for Everything.  The big project I worked on required a lot of thinking and decisions on my part.  I brought this kit with me thinking I would try to create alternative cards than the instructions.  The suggested cards were too pretty to change so I didn't.  I also loved the fact that I didn't need to bring any extra supplies with me.  The card bases were pre-made, the banners were already cut, the flowers and circle pieces were stickers (even easier!!) and the  Rococo Rose Ink was included.  All I had to do was stamp an included

Thoughtful Blooms Encouragement Card

Image
Hi, friends! This week's tutorial is an encouragement card.  I found the idea on Pinterest from Stampin with Julianne Richards .  Even with all of the layers, this is a pretty simple card just lots of cutting.  Yet, it's still beautiful!  The bolded words are Stampin' Up!© products and are linked in my store below. Instructions 1. Cut a piece of  Blushing Bride Cardstock  to 5.5" by 8.5".  Score card to 4.25 by 5.5.  Fold. 2. Cut a piece of Tropical Escape Designer Paper to 4 by 5.25. Unfortunately, this is a retired Stampin' Up! product.  Glue the Tropical Escape Designer Paper to the Blushing Bride card base.   3. Cut another piece of  Blushing Bride Cardstock  to 3.5 by 4.5.  Glue this to the front of the card base. 4. Cut a piece of  Whisper White Cardstock  to 3.25 by 4.25.  Stamp the larger flowers in the  Thoughtful Blooms  stamp set in  Blushing Bride  I nk .  (Oops I forgot to take a picture of s

Paper Pumpkin Party

Image
Paper Pumpkin is turning 7!  Let's Celebrate!!  What is Paper Pumpkin? Paper pumpkin is a monthly subscription box.  Each box includes an exclusive stamp set, an ink spot, and everything else needed to complete cards/treat boxes/tags.  The March box includes everything to make 12 4x6 cards.  Because it's Paper Pumpkin's birthday, this kit comes with an extra exclusive stamp set that's larger than normal! Party Details: Where are we partying?  My house!  When you RSVP I will give you my address!  I'm on the Glen Allen/Ashland line about 15 minutes from Short Pump. When?  March 27 from 7-9 pm What?  We'll make the suggested cards and some alternative card ideas together and have cake! Cost:   A one month subscription is $25.  (That's a $2.08 per card!) How do I RSVP? Email me! emcrafts96@gmail.com.  From there, I will put in your order for the Paper Pumpkin and collect your payment. RSVP by March 10 - I will not be able to get kits

Valentine's Day Box

Image
Hi, friends!  This week's card tutorial is actually not a card but rather a treat box.  I'm going to a Valentine's Day party and wanted to make a Valentine for the kiddos.  I first learned how to make the box at a workshop my up-line hosted.  We stamped a design onto our paper first and then made the box.  I love these because they're very easy to make and versatile!  For Thanksgiving, I made the boxes to use as place settings at our table.  Inside, I put 2 Kit-Kats.  They fit perfectly!  For the Valentine's Day Box I'm going to put a few Hershey Kisses and a little toy found in the Target Dollar Spot.   Supplies Needed: (All Stampin' Up! products are linked at the bottom of the page.) Paper (6.5 in. by 5 in.) Tape Runner Hole Punch Scoring tool Paper Cutter Ribbon Box Instructions 1. Cut a piece of From My Heart Specialty Designer Series Paper to 6.5" by 5". 2. Using a scoring tool score on the short side at 1