Craft Retreat Recap
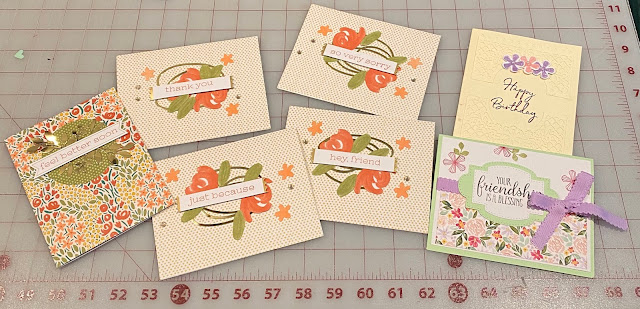
Hi, friends! This past weekend I went on a craft retreat with some friends and other ladies in my Stampin' Up! team. It was great! While I can't show you the big project I worked on yet, I wanted to share a few cards. As always, anything in bold is linked below.
The first set of cards took me maybe 10 minutes to make all 5. How?? Paper Pumpkin. These are all from the December 2019 Paper Pumpkin called Something for Everything. The big project I worked on required a lot of thinking and decisions on my part. I brought this kit with me thinking I would try to create alternative cards than the instructions. The suggested cards were too pretty to change so I didn't. I also loved the fact that I didn't need to bring any extra supplies with me. The card bases were pre-made, the banners were already cut, the flowers and circle pieces were stickers (even easier!!) and the Rococo Rose Ink was included. All I had to do was stamp an included sentiment and put the pieces together. Unfortunately, you can't get this particular Paper Pumpkin anymore but a new one comes out each month! I'm hosting a Paper Pumpkin party in March. See this post for more information.
The next card was inspired by Amy Frillici from Gathering Inkspiration. The card base is a mint green paper I had in my stash. The front is a piece of white card stock sized to 4' by 5.25'. I used Thoughtful Blooms to stamp the top half of the paper in Berry Burst ink. The bottom half is a piece of Best Dressed Designer Series Paper. This is probably my favorite paper so far! The sentiment and the die cut are from the So Sentimental Bundle and it is stamped in Black Memento Ink. The ribbon is something I had in my stash. I tied the bow around the white paper before gluing it onto the base and before I glued the sentiment on. I wish I would have made the bow a smidgeon smaller and centered the sentiment first.
The last card I made is for Granna's birthday in April. She doesn't know how to use the internet so don't let her see it! The paper is something from my stash. I love how the same color cut out looks. The die is from Jubilee Beauty. I don't have the coordinating stamp set so I improvised on the flowers. These are from the Pleased as Punch Designer Series Paper cut out with the Small Blooms Punch. The sentiment is from Happy Birthday to You stamped in Blackberry Bliss ink. You can't see it in the picture but I spritzed the front of the card with Champagne Mist Shimmer Paint. It's so beautiful and so simple to make.
Making cards doesn't have to be difficult. Sometimes simple stamping is more beautiful than an elaborate card. I'm starting a 6 session Stamping 101 class. These will be about an hour long and we'll make a project each time. Email me if you're interested in signing up.
Product List


Comments
Post a Comment